



How to Add Product Colours, Sizes and Variations in WooCommerce
This guide explains how to correctly add colours, sizes and product variations in WooCommerce when using the Flatsome theme. Following the same process for every product keeps the store organised and ensures that product variation swatches display correctly.
Check the Product Attributes First
Before creating or editing a variable product, first check that the required attributes and options already exist.
The main global attributes, such as Colour and Size, should already be listed here.
Always use these existing global attributes. Do not create another Colour or Size attribute for an individual product.
Check the Flatsome Attribute Type
Flatsome allows global WooCommerce attributes to display as colours, images or labels instead of normal dropdown selections.
For the main product attributes, use the appropriate Type:
- UX Color for product colours.
- UX Label for sizes such as Small, Medium and Large.
- UX Image when an image should represent the option.
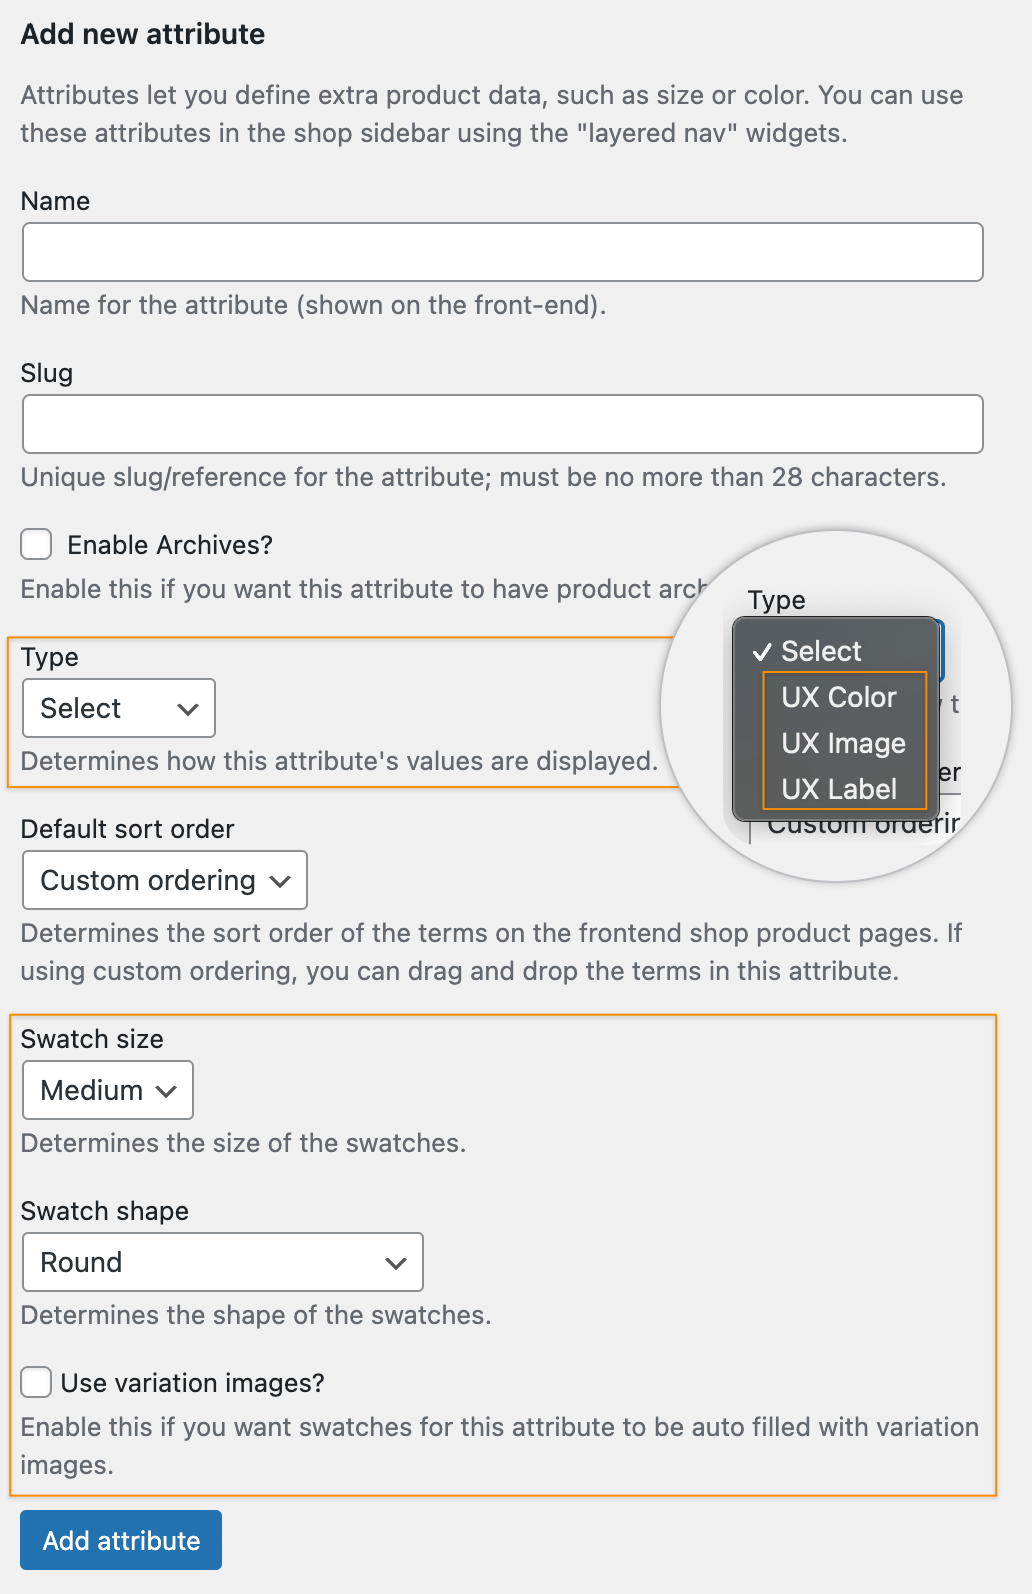
Flatsome attribute types can be set to UX Color, UX Image or UX Label.
Add or Edit Colours
Under Products → Attributes, find the Colour attribute and click Configure terms.
This is where all the colours used across the website are managed.
From here you can:
- View existing colours.
- Add a new colour.
- Edit an existing colour.
- Set the Flatsome colour swatch.
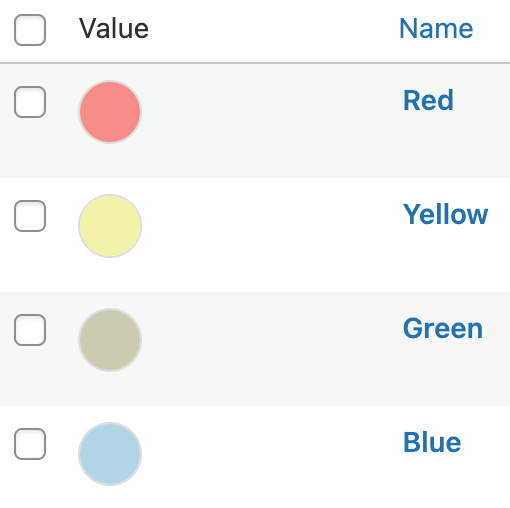
Configure the individual terms available under the global Colour attribute.
Add a New Colour
When a product has a new colour that is not already available, add it under the global Colour attribute before creating the product variations.
Enter the name of the new colour and select the matching colour using the Flatsome colour picker.
For example:
Save the new colour. It will now be available for selection when editing any product on the website.
Add or Edit Sizes
Sizes are managed in the same way as colours.
Check if the required size already exists. If it does not, add the new size before setting up the product.
Examples may include:
- Small
- Medium
- Large
- XL
- 2XL
- 3XL
Set the Product as a Variable Product
Create a new WooCommerce product or open the existing product that needs variations.
Scroll down to Product data and change the product type to:
This enables WooCommerce’s Attributes and Variations options for the product.
Add the Existing Colour Attribute
Under Product data, go to:
Select the existing global Colour attribute.
You will now be able to select from the colours that have already been created under Products → Attributes → Colour.
Select Only the Colours Available for the Product
Select only the colours that are actually available for this particular product.
For example, the website may have these global colours:
If this product is only available in Black, Navy and Olive Green, select only those three colours.
If a colour has already been selected but is not available for this product, remove it from the product’s selected attribute values.
Make sure Used for variations is enabled and save the attributes.
Add the Available Sizes
If the product is available in different sizes, select Add existing again and choose the global Size attribute.
Select only the sizes available for this product.
For example:
Enable Used for variations and save the attributes.
Generate the Product Variations
Once the attributes have been saved, go to:
Select Generate variations.
WooCommerce will create the possible combinations using the colours and sizes selected for this product.
For example:
- Black / Small
- Black / Medium
- Black / Large
- Navy / Small
- Navy / Medium
- Navy / Large
Complete Each Variation
Open each generated variation and enter the required information.
Check the following:
- Regular price
- Sale price, if applicable
- SKU, if required
- Stock quantity or stock status
- Variation image, where required
Click Save changes once the variations have been completed.
How the Flatsome Variations Appear
Flatsome uses the attribute settings created earlier to turn the standard WooCommerce selections into visual swatches and buttons.
Colours can display as colour swatches, while sizes can display as easy-to-select labels.
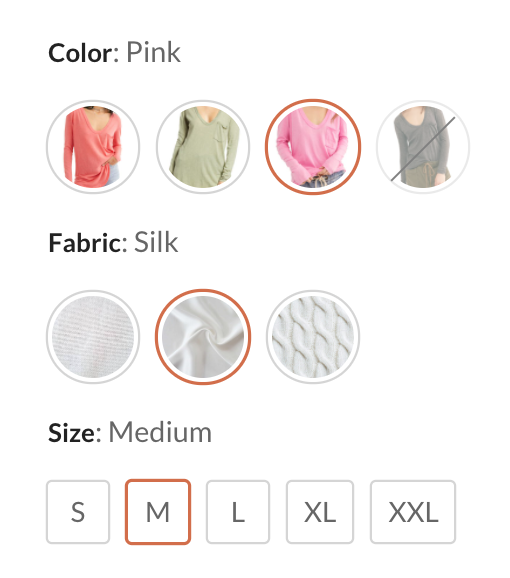
Example of Flatsome variation swatches displayed on the product page.
Update and Test the Product
Click Update or Publish, then view the product on the website.
Check that:
- Only the correct colours are displayed.
- Only the correct sizes are displayed.
- All available combinations can be selected.
- Unavailable combinations cannot be purchased.
- The correct price appears.
- The correct product image appears.
- Stock information is correct.
- The Add to Cart button works correctly.
Quick Checklist
- Check Products → Attributes first.
- Use Configure terms to manage colours and sizes.
- Add a new colour or size only if it does not already exist.
- Use the existing global Colour and Size attributes.
- Set the product to Variable product.
- Select only the colours and sizes available for that product.
- Enable Used for variations.
- Generate the variations.
- Remove unavailable combinations.
- Add prices, stock information and variation images.
- Save and update the product.
- Test all options on the live product page.
